When an animal enters the care of your organization, add it to your organization's tracking process.
Use the Add an Animal page to add new animals to your account. Remember that animals which are available for adoption are exported to the adoption listing websites and show up on your RescueGroups.org account automatically after you add them. Once animals are added, you can start managing the information about them. Animals available for adoption are exported to the adoption listing websites.
The Animals menu allows you to add animals and manage information available about them. Once an animal is added, you can edit the description, delete them from your account, set their status to Available, and when adopted, change their status to Adopted, using the selections in the Animals menu.
And of course, there's a video we'd like you to see:
Adding New Animals Including Images and Videos
Where do I find it?
Once you log in to your account from https://rescuegroups.org, select Animals at the top of the screen. From the pull-down menu, select Add an Animal.

Adding user roles for your volunteers
See the chapter About Roles, Security, and Permissions for more information about the roles for your volunteers. There are three primary roles associated with adding an animal:
- The Animal Admin role allows that volunteer to manage everything about all of the animals in the organization.
- The Animal Add role allows that volunteer to add animals.
- The Animal Foster Update allows that volunteer to manage all the information about their own foster animals.
We recommend you grant your trusted fosters the ability to manage their own foster animals ( Animal Foster Update). You can remove that role when they leave your organization. We also recommend that you have at least one volunteer with the role of Animal Admin. That person can oversee all the information about all the animals.
Finding the "Add an animal" feature
There are four ways to find the Add an Animal feature.
- Animals > Add an Animal

- Animals > List > Add an Animal

- From the Quick Links on the Home Page

- Using the Add a new... on the left navigation bar of the Home Page

To help you add animals faster, you may want to create one or more Animal Templates. Using the templates will fill in some of the fields for you automatically. See the How to use templates section later in this Guide.
Required Fields
The only fields that are required by default when adding an animal are Name, Status, Species, and Primary Breed. All other fields can be left blank or unselected.
However, your organization can set up custom required fields. Read more about custom required animal fields later in this Guide.
Entering animal data
Entering animal data
The Add an Animal fields include sections to help you enter all the animal's data. You may enter the information you have, save, and return to edit later.
Basic Information
In this section, you enter information such as the name, breed, sex, color, birthdate, and whether or not the pet has a special need. Certain of these fields are required. In order to save and return to the animal's description later, you must complete all the required fields.
When you are doing an intake of an animal, you must enter a name. To help you choose a name, should you not have one yet, we've provided two options:
- List: Male Female is a clickable list of names of either sex. Clicking a name enters it into the Name field.
- Random: Male Female makes it even simpler. Clicking Male or Female selects a random name from the list and enters it into the field.
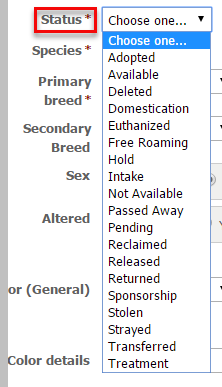
In the Status field, select the animal's status in terms of adoptable or not. By using the Status field, you enter data which you can later use to pull a report by status, for instance, all the animals which were trapped and released back to their feral colonies, or all the adopted animals. On intake, if the animal is immediately adoptable, select Available.
In the Basic Information section, you also enter the animal's description. This field contains the basic editing functions you find elsewhere in your account. See the chapter, Using the editor in this guide. You can use boldface, italic, or underlined text to help you highlight specific information. You can change the font, size of the text, or color, and you can use a highlight color to draw attention to particular information. You can use bullet points or a numbered list, left, right, or center justify, and heading sizes to change the look of your descriptions. For instance, notice the changes to this description: font, type size, highlighting.

In the Personality and Behavior section, you can highlight aspects of the pet's personality type. You can select as few or many as you want.
The Compatibility section let's you select who your adoptable pet relates to best.
The Administrative section is for your organization to enter information such as the date the animal was received, or the date the animal was made available for adoption, as well as the Foster's name, the location where the pet is staying, and the microchip number.
The Sponsorship Options section lists information for soliciting sponsorships for medical or maintenance purposes.
The Adoption Options section allows you to enter the information from a completed adoption, such as the fee and the new owner.
The Euthanasia Information is self-explanatory and helps your organization track animals that had to be euthanized for medical reasons.
Additional Notes and Comments allows your organization to keep private notes about the animal, list the origin, such as "Owner Relinquished," and any special needs the animal has. You can also list sponsors who have contributed to this animal's care.
Custom Animal Groups Membership lets you place the animal into any special groups your organization may have created, such as "FM2978 Petco" or "Website only."
Media is where you upload photos or videos of this animal.
Export Accounts Selection allows you to export or share the animal. Sharing has to do with sharing with your partners, so if you have partners with whom you share animal information, this is where you decide which animals can be shared.
Saving
When you have entered all of the information for the new animal you have a few options when saving:

Button | Description |
Save | Save this animal and go to the new animal’s view page |
Save and New | Save this animal and return to add an additional new animal |
Save and Clone | Save this animal and return to add an additional new animal with the same information (useful when adding litter mates) |
Popular Questions
Have a question about this topic?
Overview
Content Tools