Once Sponsorships are enabled, and Allow Sponsorship is selected for a pet, the link to ‘Sponsor This Pet’ will appear on the pet’s web page.
Enable Sponsorships
To use the Sponsorships feature:
- Next to Animal Sponsorships, select Enabled.
In order to use the sponsorship feature your site will need to setup your PayPal account in your Affiliates. A PayPal business account is required to use recurring payments.
Select an Option for Sponsorship Link Page
Select one of the following for each animals "Sponsor this Pet" link
If you select: Use a general sponsorship page:
- If Use a general sponsorship page is selected, the link to sponsor a specific pet will take a user to your site's general sponsorship information page.
- When a donation is processed, it will not have the name of the animal.
- If you choose this option, be sure to add content to your web site's general sponsorship page with how to donate/sponsor. You will find that page in your Web Pages List > Sponsorship Information.
If you select: Use a sponsorship page for each animal:
- If Use a sponsorship page for each animal is selected, when a user clicks on the Sponsor this Pet link on the animal's page, it will take the user to a page specific to that animal and its unique sponsorship options. When the donation is processed in PayPal, you will see that the sponsorship was for that specific animal.
Next fill out the remaining options and click Save Settings.
You can select Allow Sponsorship regardless of the status of the pet; although if you want the public to be able to see the pet you’ll want to select either Available for Adoption or Available for Sponsorship (only certain animal statuses are public, regardless of the Allow Sponsorship option – see Animal Statuses for more information). Please refer to the Animal Fields article for more information about the specific Sponsorship fields.
Th Sponsorship Feature on Your Website
- Once Sponsorships are enabled, and Allow Sponsorship is selected for a pet, the link to ‘Sponsor This Pet’ will appear on the pet’s web page.
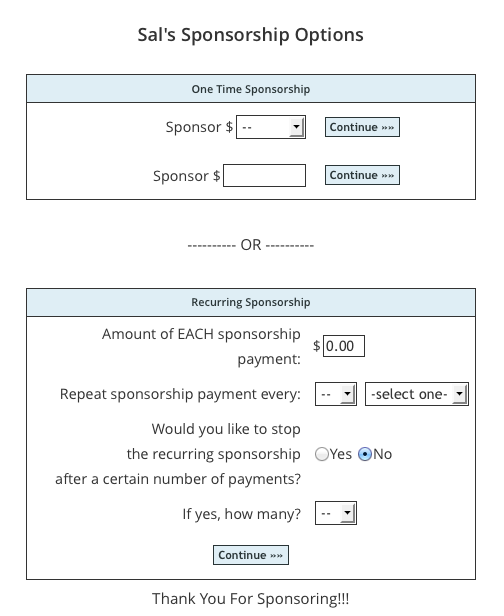
- If you selected ‘Use a sponsorship page for each animal’, that link will take the visitor to the pet’s specific Sponsorship Page which will show:
- A photo of the pet (if uploaded)
- The pet’s description or Sponsorship Details.
- There, the visitor can chose to make a one-time sponsorship, or a recurring sponsorship. That is if you have those options enabled.
- Your predetermined sponsorship amounts will be shown, as well as a custom sponsorship box, if you have enabled custom sponsorship amounts.
- After selecting the sponsorship options (one-time or recurring), the visitor can enter their contact information, and the purpose and note concerning the sponsorship.
- On the sponsorship checkout page, the visitor can review the sponsorship details, and click Add to PayPal Cart when they are ready to checkout.
- The rest of the Sponsorship process is completed by PayPal.
Confirming Sponsorships
You can view all of your existing Sponsorships, as well as the Unconfirmed Sponsorships on the Animals > Sponsorships page. An unconfirmed sponsorship is one that was entered by a visitor, but you have not yet confirmed you received the payment.
When you confirm a new Sponsorship, you can edit the amount, type, purpose, purpose details and the state and end date of the sponsorship. Confirming or adding a sponsorship also adds a donation associated with the contact.
From that page, you can also manually add sponsorships if needed
Enable Sponsorships for a Specific Animal
To enable sponsorships for specific animals, please see the section on Enabling Sponsorships for a Specific Animal


