Emails sent from the Email Marketing Service will include your organization's address from your account. This is a requirement of the CAN-SPAM Act. The organization's street address will always be included.
There are eight steps for creating an email campaign, as follows. Detailed instructions are below. Once you create your first campaign email, you'll wonder how you lived without this tool!
- Add a campaign.
- Enter the campaign information.
- Select a template.
- Edit your campaign.
- Preview your email.
- Send a test message.
- Add contacts.
- Activate the campaign.
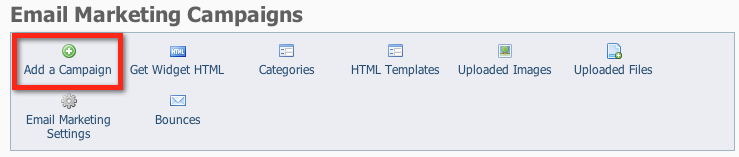
Adding a campaign
To start your email campaign, click Add a Campaign from the Email Marketing Campaigns menu.
Once you've mastered your first email campaign creation and you realize how easy it is, you can create a campaign when you have the time to design it, and send it out when you're ready.
A campaign may be sent just once, or it could be scheduled to send on a regular basis automatically. You might send a one-time campaign to announce an event or the results of a board meeting. You might schedule a campaign to automatically send an email to your new adopters.
The Add a Campaign page includes the following fields:
- Name: The name of the campaign.
Example: Holidays 2011 Newsletter
- Description: A description of the email campaign.
Example: Newsletter for late December with Santa pictures
- Category: The Email Marketing Campaign Category. The Category determines who is going to receive the email.
Example: Newsletters
- Subject: The subject to use as the email subject when sending the campaign.
Example: Happy Holidays from the Iguana Sanctuary!
- Sender Email Address: The sender/from email address to use for the campaign email. The email will come from this address, and all replies will go to this address.
Example: info@iguanasanctuary.org
Entering the basic campaign information
The basic campaign information defines the new campaign for you: you'll give your campaign a descriptive name, and fill out some other information about the campaign.
- Name your campaign.
- Enter a short Description (Optional).
- Select a campaign Category (events, fundraiser, newsletter).
- Enter a Subject your readers will see in their inbox. (You can revise this later before you send.)
- Enter the Sender Email Address. (This email will come from this address, and all replies will go to this address.)
- Click Save.

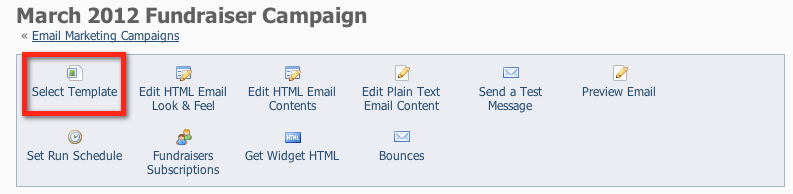
Selecting your template
IMPORTANT
Once you select a template for a campaign email message, changes to that template will not change the email message that was based on that template.
A template is a basic structure, with a particular style built in. You can select from two pre-made templates, or select the blank template and design your own.
The template includes the layout, design, and colors that will be used for the email. After you select a template you can change those design elements and add text and graphics.
NOTE:
The Email Marketing Templates page lists the built-in templates and the custom templates you create and save.
- Click Select Template.
- Click Choose under the template you want to use. (For this example, we've created a custom template and we are selecting the custom template.)
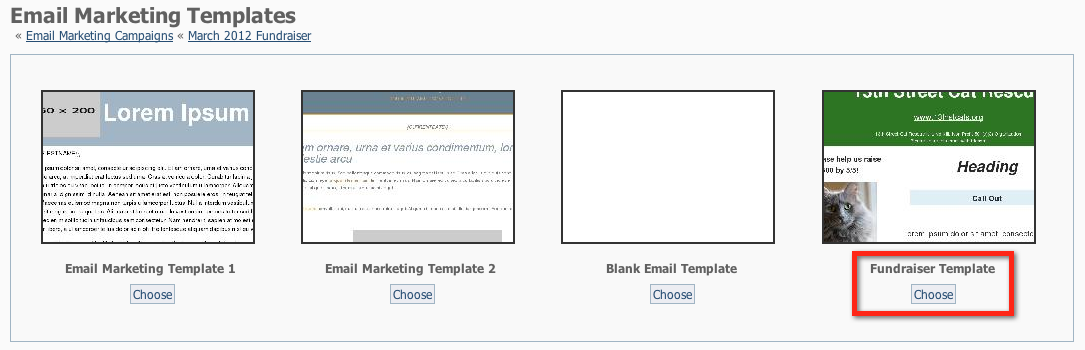
To see a preview of a template, click the name of the template, such as Fundraiser Template in the example above.
Editing your campaign
You can edit both the look of the marketing email and the contents of the message.
NOTE:
Once you've created your campaign or several campaigns, you may want to go back to one and edit it, either to resend or to have an edited, ready-to-go custom template for a future campaign. The list of campaigns, available from the Email Marketing Campaigns menu, is a data table and can be manipulated like all the other data tables in the RescueGroups.org account. If you need a refresher on how to use data tables, check out the Getting started with RescueGroups.org guide, and look for the chapter, How information is organized in your account.

- To adjust the template font, font size, colors, and width click Edit HTML Email Look & Feel.

- To edit the contents of your campaign (text, photos etc), click Edit HTML Email Contents.
Undoing changes
At any time you can click Undo Changes and the preview will forget your unsaved changes and reload with the saved Look & Feel settings.
Clicking Undo Changes will cause you to lose any unsaved changes.
Editing an existing campaign
To edit a pre-existing campaign, go to the Email Marketing Campaigns menu and select the campaign to edit.
Scroll to the name of the campaign you want to edit and click the edit icon.

Changing the colors in the email
To change the colors in the email:
- Select the colors for the background and fonts.
If you know the hexadecimal color code, enter it in the appropriate field (#ffffff).
If you do not know the hexadecimal code, click the multicolored squares to open the ColorPicker and select a color. - Select the font family and size.
- Click Refresh Preview at any time to view your changes in the Preview area below.
- When done, click Save Changes.

Editing the HTML contents
IMPORTANT
When adding content:
If you are pasting text from Microsoft Word or an email, be sure to use the Paste from Word, or Paste as Plain Text icons. This removes any non-HTML-compliant formatting. These icons are on the top row.

To change the text in the message, click the Edit HTML Email Contents button.
![]()
You can include a signup box so that your contacts can elect to receive more emails from you. Read the page, Email Sign Up Widget Code.
Select the part of the email message you want to change:
- Click Header Content, Main Content, or Footer Content to edit the contents of each of those sections of your email.

For this example, we clicked Header Content.
- Edit the content by typing in the editor (the green area in our example)
- Format your text using the icons in the editor.
- You can also Upload an Image or File by clicking the buttons Upload an Image or Upload a File.

- When done, click Preview at the bottom of the page to see your changes.

- After reviewing your content, click Back to Campaign.

- When you've completed your changes, remember to click Save Changes.

Sending a test message
To check the way your email will be viewed by the recipients, send a test email to yourself. If you don't like it, return to the editing screens to change the campaign.
Test messages count toward your total emails. Please be sure to take this into consideration when sending test emails.
Overview
Content Tools