Page History
...
There are ten steps for creating an email campaign, as follows. Once you create your first campaign email, you'll wonder how you lived without this tool! In addition to these steps, it's very helpful to familiarize yourself with the Email Marketing Settings page, where you can view your bounced emails, keep track of how many emails you've sent and how many you have remaining in your quota, and some other information. Read about it in Email Marketing campaign settings.
- Review and change your settings (See the section About email marketing campaign settings).
- Add a campaign. (Information Below)
- Enter the campaign information. (Information Below)
- Select a template. Review and change your settings (See the section About email marketing campaign settings).(Information Below)
- Edit your campaign.
- Preview your email (See the section about editing your campaign).
- Send a test message.
- Add contacts.
- Create a run schedule for the campaign (the campaign will not run until you activate it.)
- Activate the campaign.
...
- Subject: The subject to use as the email subject when sending the campaign.
Example: Happy Holidays from the Iguana Sanctuary!
Sender Email Address: The sender/from email address to use for the campaign email. The email will come from this address, and all replies will go to this address. Any active email can be used for this notification and each campaign can use a unique email address.
Example: info@wildcat.org, donate@birdsalive.org, volunteer@DogsNPuppies.org.Warning We strongly recommend that you use your own domain for this type of communication to ensure email deliverability. If you use a third party domain like aol.com, yahoo.com or yahoo.ca, our system will automatically replace your sender email address with info@rescuegroups.org in your campaigns. This helps increase the email being successfully delivered to your subscribers as those domains do not let us send mail on their behalf.
To add your campaign:
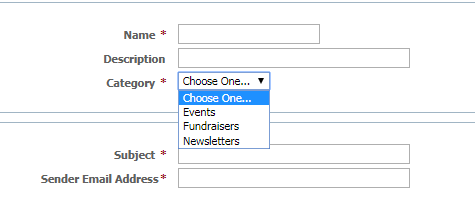
- Name your campaign.
- Enter a short Description (Optional).
- Select a campaign Category (One of these: events, fundraiser, newsletter).
- Enter a Subject your readers will see in their inbox. (You can revise this later before you send your email.)
- Enter the Sender Email Address. (The email you send will come from this address, and all replies will go to this address.) You can set any active email address to be used as the sender email, and each campaign can use a unique email address.
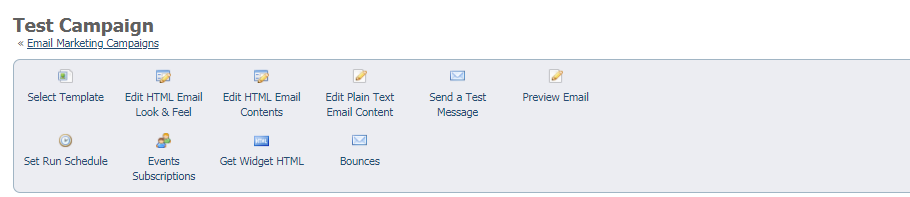
- Click Save. Once you have saved the campaign, a new menu displays.
...
Overview
Content Tools