The Pet Adoption Toolkit as discussed in this article is for the use of RescueGroups.org partner rescues and shelters. If you'd like to use the Toolkit on your company's website for a national pet search, please contact us for the necessary code to do so, using a customized version of the Pet Adoption Toolkit.
Overview
The Pet Adoption Toolkit is a collection of HTML and JavaScript code that anyone can easily paste into web pages on their website to display their pet list. Here are the benefits:
- Keeps visitors on your website: A visitor to your website stays on your website when they click to view additional information about a pet, rather than being taken to a separate pet adoption site.
- No update delay: The pet list through the Toolkit is updated immediately when you make changes to animal records in your RescueGroups.org account.
- Integrates seamlessly into your existing website: The Toolkit actually becomes part of your website by using the same colors and theme as the rest of your website.
- No advertisements!: We don't advertise any products or services through the Toolkit.
- Easy to set up: You can start using the Toolkit by following a few simple steps.
- The Pet Adoption Toolkit is completely and totally free for the users of any of our services.
Creating a Toolkit
The RescueGroups.org Pet Adoption Toolkit is designed to be an integral part of your organization's website. It's not as simple as the "pet list scrollers" because we provide a solution that not only integrates with your website, but that keeps your visitors on your website, and keeps them coming back. Because of this, RescueGroups.org offers to help you customize the Toolkit for your organization and for your website. Once you create the Toolkit and copy and paste the HTML code onto a web page on your website, contact RescueGroups.org Support and we will help you with any further customizations!
Creating a toolkit involves selecting a layout, filling out the form to describe what is included in your toolkit, and selecting the fields to include. This process results in the creation of HTML code, which you then paste into a website. Included in the code is a key that identifies your toolkit to the RescueGroups.org server.
Follow these directions to create a new Toolkit and generate a key:
- From the Features > Pet Adoption Toolkit, select Create a Toolkit. This action takes you to an information form, Create a Toolkit, that you will fill out to ensure your toolkit is customized to your needs.
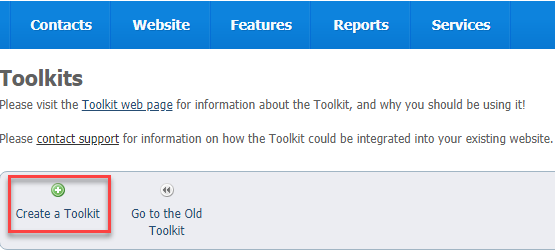
The Create a Toolkit page opens.
Enter the following information for the Toolkit on the Create a Toolkit page.
Key Field
Field Description
Name
A descriptive name for this Key. This is how you will identify this specific Toolkit.
Website Name/Title Enter the name of the website where this Toolkit will be hosted. This is used for page titles and social sharing. We recommend that you use the name of your organization for the Title. Search layout Select the layout/style you would like to use for the search page of your Toolkit. Click the Preview the Layouts link to see examples of the layouts. Pet detail layout Select the layout/style you would like to use for the pet detail page. You can see examples by using the Preview link. Select None if you do not want to have a pet detail page. Website URL Enter the URL for the website where this Toolkit will be hosted. The URL must be the direct link to the web page. This URL is used by social sharing to redirect the visitor to your website (most often to a specific pet on your website). Included Statuses
Select the individual statuses that you want to display in this Toolkit. Each status you include must also be a public status by the organization.
Included Species
Select the individual species that you want to make public in this Key.
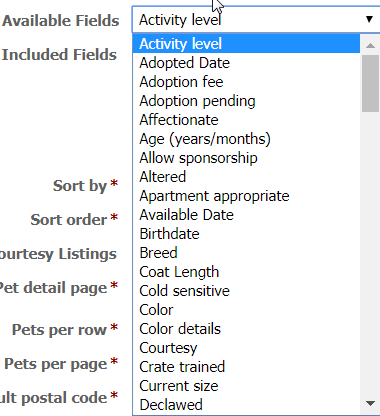
Included Fields
Select the individual pet data fields that you want to make public in this Key. These fields are then included for display on the list or grid view, not the animal detail page.
Sort by and Sort order Select the field you would like to sort the results by (default), and the order (ascending or descending). Include Courtesy Listings
Select if you would like to include, exclude or include only your courtesy listings in this Toolkit.
Pet detail page Select if you would like to use the Inline or bPopup option for your pet detail page. The inline option will replace the search content with the animal detail content, but the bPopup will open a "popover" with the animal detail information. Pets per row and Pets per page
Select how many pets should be shown per row and how many pets per page. Not all search layouts use both options – For example, the list layouts only use the Pets per page option.
Default postal code
Enter the default postal/zip code we should use for animal searches if we are unable to determine the visitors' geographic location.
Show the search form Select if you would like to show the search form. If you select No the search fields will be hidden on the Search page (except in Grid 1). Search results style Select the style for the search results pictures.
Table: the pictures will keep their original aspect ratio
Fixed: the pictures will be zoomed/cropped to fit the fixed size (some of the pictures may not be visible)
Columns: (coming soon)- Copy the resulting HTML code.
- Click Save Toolkit to save your selections.
- Copy and paste the HTML code into your web page:
- Click the HTML icon.

- Copy the code into your web page where you want the Toolkit to appear.
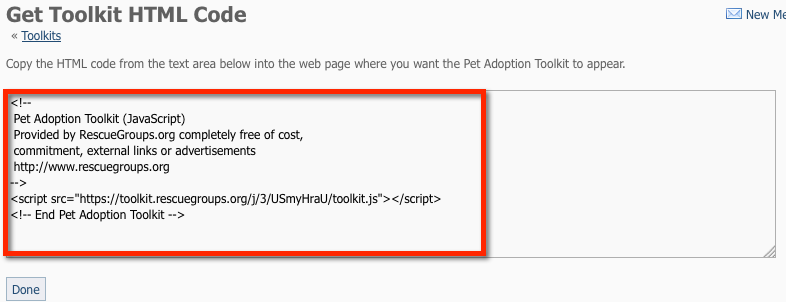
- Click Done to save the Toolkit and move on to style the Toolkit and add Advanced Filters.
- Click the HTML icon.
Please be aware only one Toolkit can be added per web page.
Understanding the Available/Included statuses and fields
Two sections that you should understand in the toolkit creation process are the Available Statuses and the Available Fields sections. (See below.)
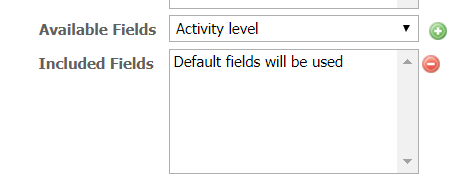
To use these sections, click the down arrow next to the field, such as Available Fields, and use your cursor to highlight a selection. Then on the right of the field, click the green plus arrow ![]() to add it. It will be copied from the Available Fields to the Included Fields section and will be added to your layout.
to add it. It will be copied from the Available Fields to the Included Fields section and will be added to your layout.
Included fields are displayed on the list/grid view, not the animal detail page.

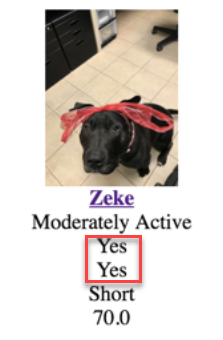
Be selective in choosing fields to display on the toolkit. When you include a field, the toolkit displays the result of that entry, not the name of the entry and the result. Therefore, if you select a field whose result could be yes or no, you may see the example below displayed on your toolkit search layout. Your visitor has no idea what that yes or no means. Likewise, if you include the adoption fee, it will not display as a monetary value, simply as a number, and a visitor may not immediately grasp what that number means. We recommend you put the adoption fee in the description instead of in the toolkit layout.
Please note that some layouts display the information differently.
Fields that do work well in the layouts include:
- Activity level
- Age
- Birthdate
- Breed
- Color
Search grid 1 includes the breed and the coat length.

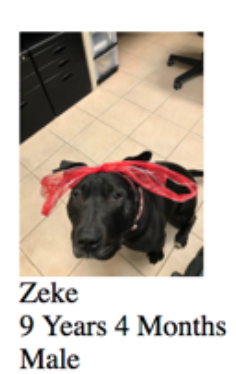
If you add the name, age, and sex fields, the result below displays.
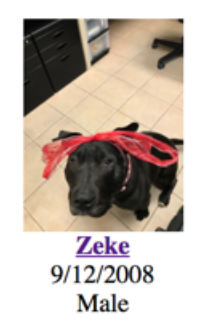
Grid 3 has a default of name, breed, and coat length, just as does grid 1. Adding the name, birthdate and sex results in the display below.
Updating styles
You can style your toolkit to match the colors and width for your website. As you make changes, you can refresh your browser window to see those changes reflected on your website. Follow these instructions to update the styles for your Toolkit.
- From the main Toolkits page, click on the Name of your toolkit you would like to style.

- Click Update Styles.

- You can edit the Search Container Options
- You can enter your own Custom CSS
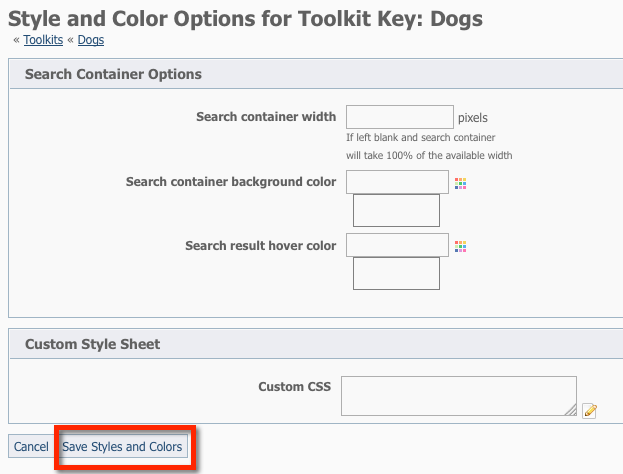
- Click Save Styles and Colors.
For advanced styling, see the section, Understanding the advanced styling of Toolkit Keys or custom CSS.
Overview
Content Tools