Adding an Inventory item
To add an inventory item, from the main Inventory page, click the Add an Item button. A form opens.
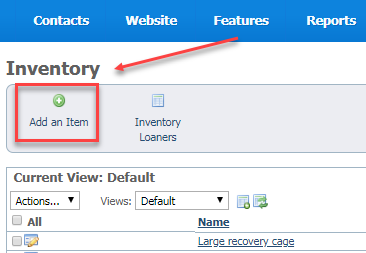
The first required field on the form is Name, which is the name of the item, such as, in the screenshot above, "Large recovery cage." There are two others: Quantity (how many of the item do you have) and Cost (how much is it worth).
The following table provides an explanation of the fields in the form.
| Field | Explanation |
|---|---|
| Name | Name of item |
| Item Number/ID | A number your organization assigns to the equipment or item to be loaned |
| Received Date | If you also want to track the lifetime of the item, this is the date your organization received the item |
| Source | Where did you get the item? For instance, purchase, donation, salvage |
| Quantity | How many of these items do you have? |
| Cost | How much are they worth? |
| Condition | What condition is the item in on receipt? |
| Category | What category does it fall under (if your organization wants to assign a category, such as trapping equipment or pet supplies |
| Storage Location | Where is the item stored? This might be at a volunteer's home (Sara's garage, for instance) or a storage space or even at a store where you do adoptions |
| Description | This is how you would describe the object, such as: 3 x 4 x 2 foot collapsible black cage with removable plastic floor |
| Disposed Date | The day you retired the item |
| Disposed Destination | This could be as simple as "trash" but perhaps your organization donates retired items to a pet resale shop or volunteers are allowed to take them |
This is the form.

Remember to click the Save Inventory Item button or, as with other RescueGroup.org data entry you can check the Add Another box to save the existing form and get a new blank form to add another item.
Loaning an inventory item
To track the loan of an inventory item:
- From the main Inventory page, click Inventory Loaners.

- Click Add an Inventory Item Loaner.

- Fill out the 3 required fields (red asterisk):
- Select the contact who is borrowing the item from the drop-down list of your contacts, or click the green Add icon to add the contact.
- Select the item from the drop-down list of your inventory.
- Select the loan date, either by clicking the calendar page to select today's date, or using the calendar icon to page through the calendar to the date.

- The other fields are optional:
- The Loan Condition field allows you to make note of the condition of the loaner, such as in the example above, the carrier is in "fair" condition when loaned out.
The Due Date is the date on which the equipment should be returned.
NOTE:
You can create an online form contract to use when you loan equipment.
The Return Date is the actual date the equipment was returned.
And, of course, the Return Condition is a note of the condition of the item on return.
- The Notes section is for anything else you want to say about this loan, for instance, in the case of a community member, the situation for which they need the equipment.
- Click Save to save this form, or Add Another to save and add another form.
You can now see the item on loan and when it is due in the inventory loaners data table.
Understanding the inventory data table
The main Inventory data table shows all of your Inventory and the State. The state is automatically added, and there are only two: Storage and Borrowed. When you first enter an inventory item into the database, its state will be "Storage." When you edit the item to add a borrower, the state is automatically adjusted to "Borrowed."

Because the Pet Carrier below is borrowed, the state is listed as borrowed as opposed to storage and the current location is the contact who borrowed the item.

Returning Inventory Loaners
- To return an item that is on loan, click Inventory Loaners.
- Enter the Return Date.
- Click Save.
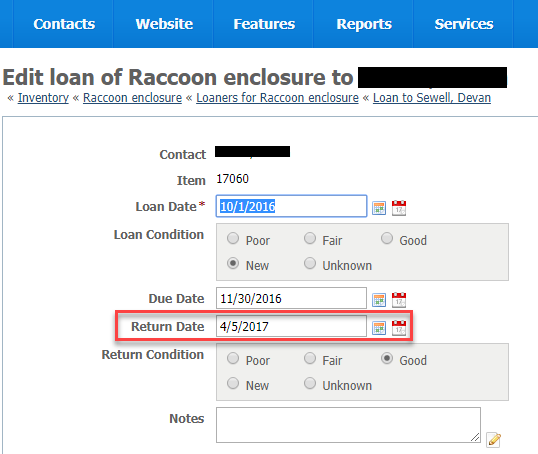
Now you can see on the Inventory Loaners page that the Return Date of the raccoon enclosure has been recorded.

You can see on the main Inventory page that the State of the pet carrier mentioned above is in Storage and the Current Location is the default storage location you entered for the inventory item when you first added it to your inventory.

Overview
Content Tools