With the Website Service, you do not need to manually create pages for kittens, cats, dogs, puppies for the public to view your pet list. These pages can be automatically created for you by following a few steps.
On this page:
Enable supported species
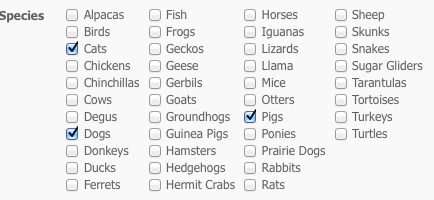
You can find the Supported Species page by going to Animals > Settings and clicking Supported Species.
IMPORTANT
To manage the supported species list, your volunteers must have the role of site admins. They will then be able to change the species supported by the organization and shown in your drop-down menus.
To enable the species your organization supports, simply check the checkboxes next to each species and save. Only those species selected will appear in the species drop-down menus (for example, when adding animals or selecting species for attendance at an event).
Enable Animal Special Lists
You can find the Special Lists page by going to Animals > Settings then clicking Special Lists.
The Special Lists feature automatically creates lists of animals that meet certain criteria, for example, Special Needs, Recent Arrivals, Puppies, Kittens, etc.
IMPORTANT
To add animals to special lists, your volunteers must have either the role of Animal Add or Animal Admin.
To be able to change the settings for the special lists, your volunteers must have the role of Animal Admin.

The Special Lists web pages will be automatically updated as you add your animals.
All times/ages are in days.
You can enter just the youngest age if you do not want to have a maximum age for the list.
For example:
- Kittens/Puppies: 0-180
- Teens: 181-364
- Adults: 365
(For the Adults list you would enter only enter the start age for the youngest age, and leave the Oldest blank if you do not want to use the seniors group).
IMPORTANT
You must enter a birth date (even approximate) for each animal to have age-related special lists work. Example: puppies, kittens, teens, adults, seniors.
This will automatically age the animal and move them from one list to the next as they age.

Table of Special Lists
Special List | Description |
|---|---|
Kittens / Puppies | Enter the age range, like 0/180 for animals 0 days to 6 months old to be shown |
Teens | Enter the age range |
Adults | Enter the age range |
Seniors | Enter the age range |
Urgent | Automatically updated from the Highlight field (a highlight of 0 is urgent). See the Highlighted Animalsfor more information. |
Long Time/Must Adopt | Uses the Received Date field from the animal to show only animals that have been in your organization for the specified time |
Special Needs | Automatically updated from the Special Needs animal field |
Needs a Caretaker (Foster) | Automatically updated from the Needs a Caretaker animal field |
Recent Arrivals | This uses the Received Date field from the animal to show only animals received within a certain number of days |
Courtesy Listings | Automatically updated |
Special Needs list
To automatically add an animal to the Special Needs webpage:
- Enable Special Needs in your Special Lists.
- When Adding or Editing an Animal, enter some text in the Special needs description in the Additional Notes and Comments section.
- If the special needs animal also needs a sponsor, you can enable the Sponsorships for that animal.

Adding Special Lists to a custom menu
NOTE
Many of the RescueGroups.org layouts and menus will automatically show links to the Special Lists that you enable using the Default Menu. If you have a Custom Menu you may need to manually add the Special Lists links to your menu.
If you do not see the Special List you would like to use in your website menu or in your link list, please see how to Add a Menu Item below.
Add the Animal Browse Pages to your Website Menu if you are using a custom menu
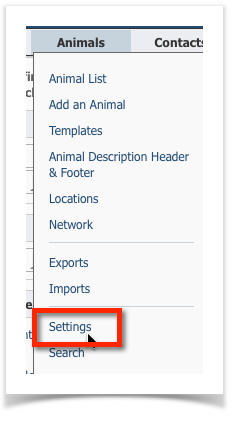
You can find the Menus page by going to Website > Menus.
Adding menu items
Follow these instructions to add menu items to your custom menu:
- Navigate to Website > Menus.

- Click Add an Item to this Web Menu.

- From the drop-down menu, select one of the existing browse pages, web pages, or forms.
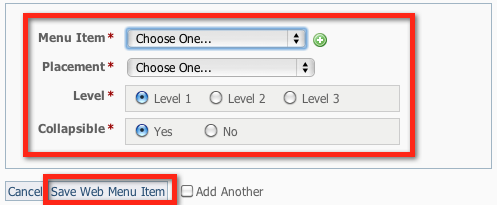
- Select the Placement to select where you would like that item to appear on your menu.
Select the Level for the item by clicking a radio button for level 1, 2, or 3.
NOTE
See More on Levels on this page for information about how to use levels of menu items.
Select whether you would like the menu item to be collapsible by clicking the Collapsible radio button for yes or no.
NOTE
You can set a Level 1 menu item to be collapsible. That means that menu items below that item and at a lower level will be grouped under the Level 1 item. A collapsible item can be set to collapse by default, which means it will be collapsed when a visitor first views your website and visitors will need to expand the item to see the levels beneath.
Remember that not all layouts support collapsible menus. Layouts 1,5,7 and 14 support collapsible menus.
- Click Save Web Menu Item.
More on levels
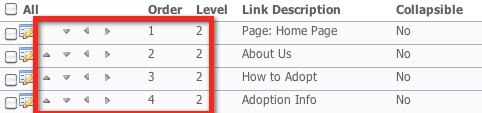
A level is an indentation of the menu item, and Level 1 is the highest level, level 2 is the "child" of the parent level 1.
Example
Home (Level 1)
- About Us (Level 2)
- Contact Us (Level 2 )
You can change the level of a menu item by clicking the gray arrows to move items in/out (Level 1, Level 2), and up/down(placement on the menu).
Adding a custom animal group to your website menu
When you create a custom animal group, two menu options are automatically created for you.
- Animal Browse: <Your Custom Animal Group Name>
- Animal List: <Your Custom Animal Group Name>
Please follow the instructions on Adding Menu Items to add one or both of these options to your menu.
IMPORTANT
If you edit the custom animal group and change its name, it will also change the Link Text of any menu items associated with that list. Deleting a list will remove all animals from that list and delete the menu items.
Popular Questions
Have a question about this topic?
Overview
Content Tools