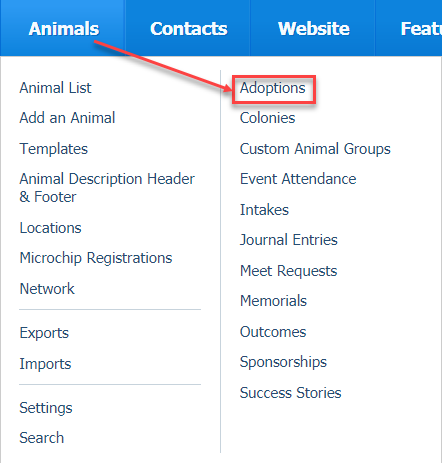
Where do I find it?
You can find the Adoptions page by going to Animals > Adoptions.
On this page:
Watch a helpful introduction video!
How to Add an Adoption
To add an adoption from the Animals > Adoptions link:
- Click the Add an Adoption button on the uppper left of the page. The Add Adoption page opens.

From the Add Adoption page:
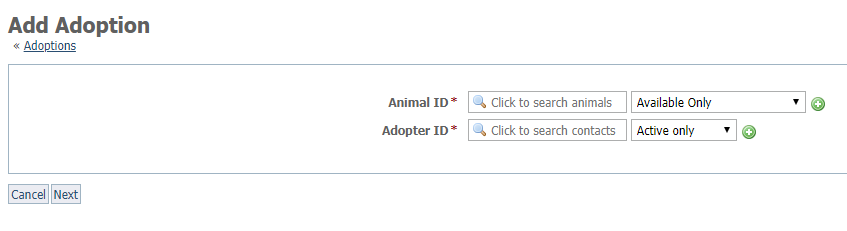
You don't have to wait for the list to load in either the Animal ID or the Adopter ID field. You can start to type the name of either the animal or the contact because these fields act like search fields.
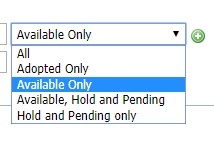
Select the animal which is being adopted by clicking in the Animal ID field to get a list of the animals which correspond to the option you have selected in the right drop-down list. Select from Available Only, All, Adopted Only, Available, Hold and Pending, or Hold and Pending only.
If the animal being adopted is new, or is not in your database for whatever reason, you can click the green circle with the plus sign in it to open the Add an animal page so that you can immediately add the animal. In the same way, if the adopter is not yet a contact, you can click the green circle with a plus sign to open the Add a Contact page.
- Select the adopter by tapping in the field for Adopter ID to see a list of Contacts corresponding to the option you have selected in the right drop-down list: All, Active only, Not active only.
- Click the Next button at the lower left. The Adoption Options page opens.
- From the Adoption Options page, fill out the fields. Because you have already selected the animal and contact as in the above instructions, those names should display at the top of the page.

- Select the Online Form from the list of submitted online forms.
- Fill in the date of the adoption. As with our other data tables, you can select a date from the calendar icon to the right of the field, or click the red calendar page to the right of that icon to select today's date.
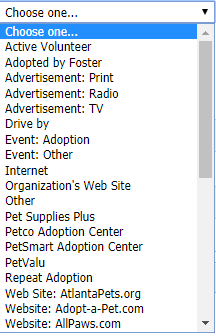
- Select a Lead ID from the drop-down list of potential leads where an adopter could have found your adoptable animal.
- Type in the Fee (adoption fee).
- Add the amount of any donation, which is in addition to the adoption fee.
- Click either the Yes or No radio button indicating whether or not you sent a letter to the adopter. This option allows you to follow up later if you want to sort by this field to find everyone who needs a letter to be sent.
- Use the drop-down list to select the Status ID (this can be changed later from Success to Return if the animal is returned).
- Select the Yes radio button to add this contact to the contact group Adopters.
- If you do not use the automatic microchip registration feature, scroll down and click the Save button to save the adoption. Otherwise, continue in the next field.
How to add the microchip information to the adoption
If your organization does not yet use the automatic microchip registration, you can read about this feature in our article About automatic microchip registrations.
Here's a video explaining the automatic microchip registration:
Beneath the adoption field above, the microchip information field can be filled out. If you do not yet have the microchip registries enabled, you will see the error message below the field for the Microchip number, which alerts you to enable the registries in order to use this feature.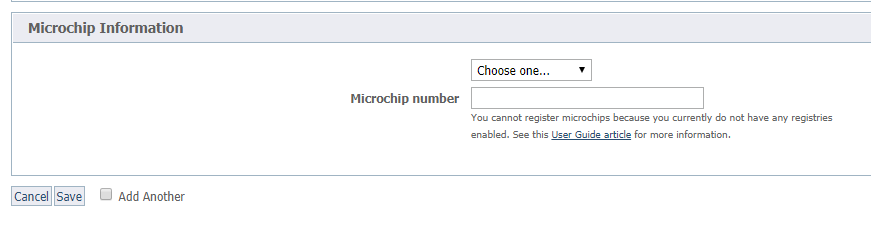
To add the microchip information:
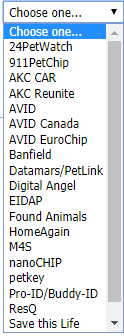
- Select a microchip provider from the drop-down list.
Type the microchip number in the Microchip number field.
Click the Save button to save the adoption.
If you are entering several adoptions, you can save time by clicking the check box next to Add Another before saving the adoption.
Popular Questions
- 0votes
- 0votes
- 0votes
- 0votes
- 0votes
- 0votes
- 0votes
Have a question about this topic?
Overview
Content Tools